
Since I like old technology it was only natural that I begin to acquire and use old office equipment. I already have some old office furniture, mainly Steelcase brand desks and a file cabinet, all dating to the early-to-mid 1960's. Like the machines, these steel furniture pieces strike me as being very well made, strong, and durable
I own only one adding machine, a Remington 10-key made in the 1930's. This machine still works, and uses modern 2-1/2 inch wide adding machine paper. It uses a two-color ribbon. The machine has keys for subtracting, totaling, and sub-totaling, as well as a multiply key, which simply allows you to add a number over and over again. additional controls include a print/non-print control, a function clear control, and a clear key that will reset any number that you have imputed. The large handle on the side is the "compute" control.
To use: This description should clarify the functions of the controls. Without pressing any other function controls, the handle acts as the 'add' control. To calculate 150+200 you first type in 1, 5, 0 on the keys, then pull the handle; then type in 2, 0, 0, and pull the handle again; to get the sum, you then press the "non-add" key. It will then lock in the depressed position. Pull the crank twice, and the sum will print on the second pull, 150+200=350. To subtract: say 75-25, first type in 7, 5, then pull the handle. Then type in 2, 5, and press the "subtract" key. It will lock in the depressed position. Now pull the handle. To get the sum, press the "non-add" key, just as in adding, pulling the handle twice will yield the answer 75-25=50. Despite the machine having a two-color ribbon, it will not do negative numbers and print them in red, as I had initially expected. To multiply: This is not done automatically like the addition and subtraction functions, but can be done reasonably. I will use a simple example to illustrate. Say you want to multiply 50x5. You type in 5, 0, and also press the "multiply key", pushing it towards the back of the machine to lock it in place. You then crank the handle five times, and then, just as in the examples before, press the "non-add" key, and crank twice. What this does is add 50 to itself five times without you having to manually enter the number in each time, and thus giving you the result 50x5=250. Unlike the other function keys, the multiply key must be manually unlocked. Correcting mistakes: The "clear" key moves one step to the left for each digit you enter, and can be pushed back to the right to clear all the digits. Say you meant to type in 574, but instead typed in 571, you can push the clear key to the right and re-enter the number, or, since it was the last digit you miss-entered, just push it to the right until you here it make a single 'click' and then push the "4" key. The "clear function" lever works in a similar way; it unlocks the "non-add" and "subtract keys", thus resetting them to their default positions. To sub-total: To get a sub total, proceed just as you would to get the total, except instead of pressing the "non-add" key, hold the "sub-total" key in the depressed position, and pull the handle twice, as you normally would for a final total. You will then get a total of all figures entered in thus far. Further figures entered in will continue to accumulate to the total until the "non-add" key is pressed.
With the invention of the phonograph in 1878, the recording of sound and speech was possible. By the mid 1880's, the use of wax instead of tinfoil had come into more widespread use, and the mechanics of the phonograph and the ease at which it could be used had advanced far enough that people were adapting the machine for office use. Both the Edison and Columbia companies developed dictating machines, and by the turn of the century a machine mechanically resembling what you see here was developed. By the 1930's, when the example pictured here has made, the dictating machine was in widespread use in offices. A few essential parts are missing from my machine, such as the speaking tube and ear tubes. The Dictaphone records on was cylinders, each 6 inches long, rotating at 80 RPM, 150 grooves per inch; cylinders for home entertainment were 4 inches long, spun at 160 RPM, and had either 100 grooves per inch for two minute or 200 gpi for four minute recordings.

As you can see, space was provided for holding 6 cylinders, and the whole thing was mounted on casters with legs similar to the 1930's typewriter stand pictured in the photographs below. The silver button to the left backs up the needle a couple of grooves so that a transcriber may repeat a few lines as needed.
These mechanical stamping devices had many uses in the office. I have two examples, a Bates machine, probably made in the 1960's, and a Japanese made Lion numbering machine.
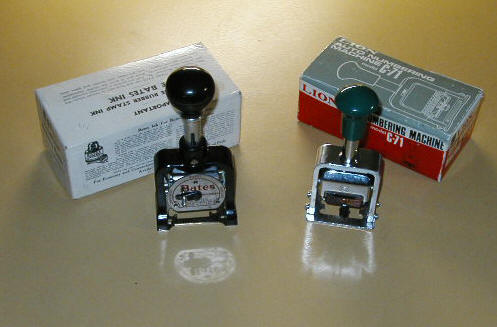
On the left is the Bates machine with its box. It has six wheels and will print numbers up to five digits, and 12 letters A-E, H, K, V-Z, all in a sans-serif type font. It can be set to number consecutively, duplicate (repeat the same number twice before advancing to the next), or repeat. The Lion machine, to the right, prints numbers to six digits in a serif type. It can be set to number consecutively, duplicate, triplicate, 4x, 6x, 12x, and repeat. The machines have inks and styli.
The history of this useful device has been recounted on the internet many times before, so retelling it is not really needed here, suffice to say that for many decades, this was the calculating tool of choice for engineers and scientists alike. Even in the era of the adding machine, the slide rule was to still be easily found in offices where multiplication and division were regularly done. These devices were made in many sizes, smaller ones like that pictured here for easy portability, and larger ones, a foot long or more, for more accurate calculations. The rule I have pictured here is a smaller 6" one complete with leather carrying case. One photo shows the rule and case, another shows a reprint of a popular instruction for using the rule.


After the introduction of affordable electronic calculators, the slide rule quickly disappeared.
What office is complete without staplers? Such devices, so simple and unassuming, were much more involved affairs in the 1930's and before. This was in the era before preformed staples. All the machines pictured here use these preformed wire staples, as I have not taken to stapler collecting. I do have a brand preference, and that is for Bates (sorry Swingline fans). Both of my Bates staplers date to when that firm's address was Orange, New Jersey.

Illustrated here, from left to right, Bates Model 56 desk stapler, a very convenient Bates Model 88P hand stapler, an interesting Arrow Model 210 back-loading stapler, and a Panasonic Electric stapler. The electric stapler is very robustly constructed, and even uses a 3-prong line cord.
The development of the typewriter from a clumsy contraption to a machine that could write faster than a person with a pen can spans the whole of the 19th. century; but it wasn't until the 1890's until it had really been perfected, with the introduction of front-stroke key action, allowing the typist to see what they were typing as it was typed. It is not surprising that this feature was used first on the Underwood, one of the most recognizable typewriters in history. Shown below is my Underwood Model 5, made circa 1922 or 1923. The frame is cast iron, with stamped and machined steel for all the other parts.

Below, a 1930's era stamped steel typewriter stand with casters.

With office life becoming more fast paced, and people at home wanting to use typewriters for personal use, portable typewriters appeared. This Remington portable was also made in the 1920's and is very compact and light.

The first photo shows the machine in its case.

Case open. However, before the machine can be used the type-bars must be raised from their folded position, as the photo below shows. The knob along the right side of the machine is for doing this. Despite its small size, this is a full-featured machine.

What is the good of having office machinery if you don't have the proper static accessories to go with them? I am of course talking about office furniture, such as desks, tables, chairs, and filing cabinets. All of my office furniture was purchase from Oklahoma State University surplus auctions. Everything was purchased for $1.00 or less, when bought in group lots.
Some people mistakenly call these "Navy Issue" desks, and probably because they saw a lot of them in the Navy. I call them inexpensive, versatile, plentiful, and adaptable. I try to use desks made between 1957 and 1968. These are very sturdy, unlike the later (and current production) desks with the chrome-plated square steel corner legs that usually fall off or out. What makes these desks so versatile is the interchangeability of the parts. Steelcase made a variety of pieces using the same top, and you can thus interchange many of the leg and drawer pedestals simply, since everything bolts together.
For all the desks of the vintage shown, the date of manufacture can be found by removing the bottom pedestal drawer. You should see a tag inside on the bottom of the pedestal with the day, month, year and model number. You can also sometimes find the date stamped in yellow or black ink under the top, behind the middle drawer.
After pulling out the bottom drawer you should see a label, like this:

Looking closer at the tag will give you the year and model number:

The desk is a model 14041 made in 1968.
You may want to try this link to see scans from the 1957 Steelcase Catalog.
If you can't find the tag, or someone has painted over it, look on the underside of the desk's top behind the middle drawer. You may even have to pull the middle drawer out to its open position:

This desk was made in November, 1966.
These are desks with only one drawer pedestal and a top that is only 3/4 the width of a full-size desk. I have one for use as a computer desk, which is pictured below sporting more vintage office paraphernalia. This desk was originally metallic gray, but was repainted cream. The wood-grained laminate on the top is also new. Any two of the pedestal drawers can be interchanged with a file drawer.

Desks with a full width top become even more versatile. I own two, but one has an extra-deep top. These tops were combined with the leg units and a single horizontal single drawer to make office tables, or with drawer/typewriter pedestals to make desks. (Desks with a typewriter pedestal use a narrow middle drawer.) For my electronics work bench pictured below, I took a single drawer table and removed the right leg, and re-bolted the left leg over to the left as far as it would go. On the right side I bolted on a 3-drawer pedestal I then reattached the middle drawer in-between, which fit without modification. The end result was a desk resembling the 3/4 desk, but with a full-sized top and a very wide knee-hole. Only a few 1/8" holes had to be drilled for sheet metal screws that attach the middle drawer under the top. The leg and pedestal used their original hardware in the oval holes underneath the top. The end result is very sturdy, and with the wide knee-hole very workbench like. Like the 3/4 desk pictured above, this desk has a new white laminate top.

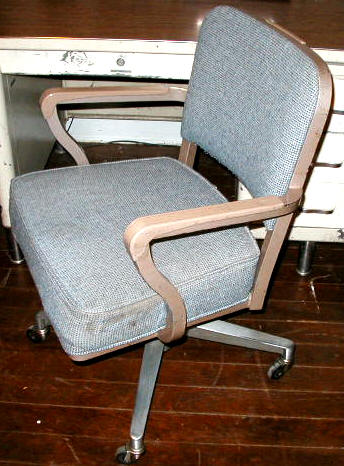
My primary desk is a full-size desk with a deep top. Like my other desks, it has had a new laminate top installed during its university life. The extra deep tops have the same holes underneath as the full-size tops, the only difference is the overhang is greater on the blank side of the desk. Thus the two tops are interchangeable. The photo shows the desk with a matching Steelcase metal office chair.

You can easily disassemble a Steelcase desk like those shown to move or swap parts. These steps are not step-by-step instructions, but a guide, as there may be differences in older and slightly later versions of these desks.
Remove the drawers (all of them) first. It will then be easiest to flip the desk over onto its top.
Remove the panel. closing in the knee-hole. It is usually fastened with sheet-metal screws at the top, and pivoted to the pedestals at the bottom. You will have to remove one of these pivots (usually 2 screws) to remove this panel. On tables with just a single drawer, remove all the sheet-metal screws holding the drawer frame to the top and two the legs. Also remove the screws holding the back rail to the top and legs.
With everything removed from the knee-hole, you can remove the legs/pedestals. On pedestals there are two sheet-metal screws going into the top on the knee-hole side. After that there are only four bolts holding the pedestal to the top, one at each corner. Use a Phillips screwdriver for the outside two. (Note: on some desks the outside corner bolts are omitted.) The nuts are captive in the top. The two on the knee-hole side will require two wrenches. On all my desks the size was 1/2". Legs have four bolts, two on each side holding them on. (Note: on some desks the outside corner bolts are omitted.)
After you loosen the hardware, you can slide the pedestals towards the knee hole, and then lift them off the top. For the legs, unless they are against the edge you can lift them straight off, otherwise remove them the same as the pedestal.
Really, it is not that hard and you can take a desk apart in under 1/2 hour. Re-assembly is just as easy, although if you are changing parts around, you may have to drill new holes for the sheet-metal screws.
These are easily found and very comfortable. Their all-metal construction makes them very solid, and they are styled to imitate earlier wooden office chairs. I have two, one in Steelcase tan with cloth upholstery, and another in metallic gray with green vinyl upholstery.

What office is complete without a file cabinet? Certainly my home office isn't, as the presence of a file cabinet in my office demonstrates. Once again, I have chosen a vintage Steelcase cabinet. Like the 3/4 desk, this cabinet was repainted from metallic gray to cream during its university days. These cabinets are built with the same rugged quality the other Steelcase pieces are. These were made in sizes ranging from 2 drawer all the way up to five drawer models.

Well, congratulations, you've read all the way to the bottom of the page!!! Here are some links to other related websites:
Please read the notes on contacting me on the Main Page.
Thank you for visiting.
Back to Main Page